Guide
Getting started with PixNet Artist
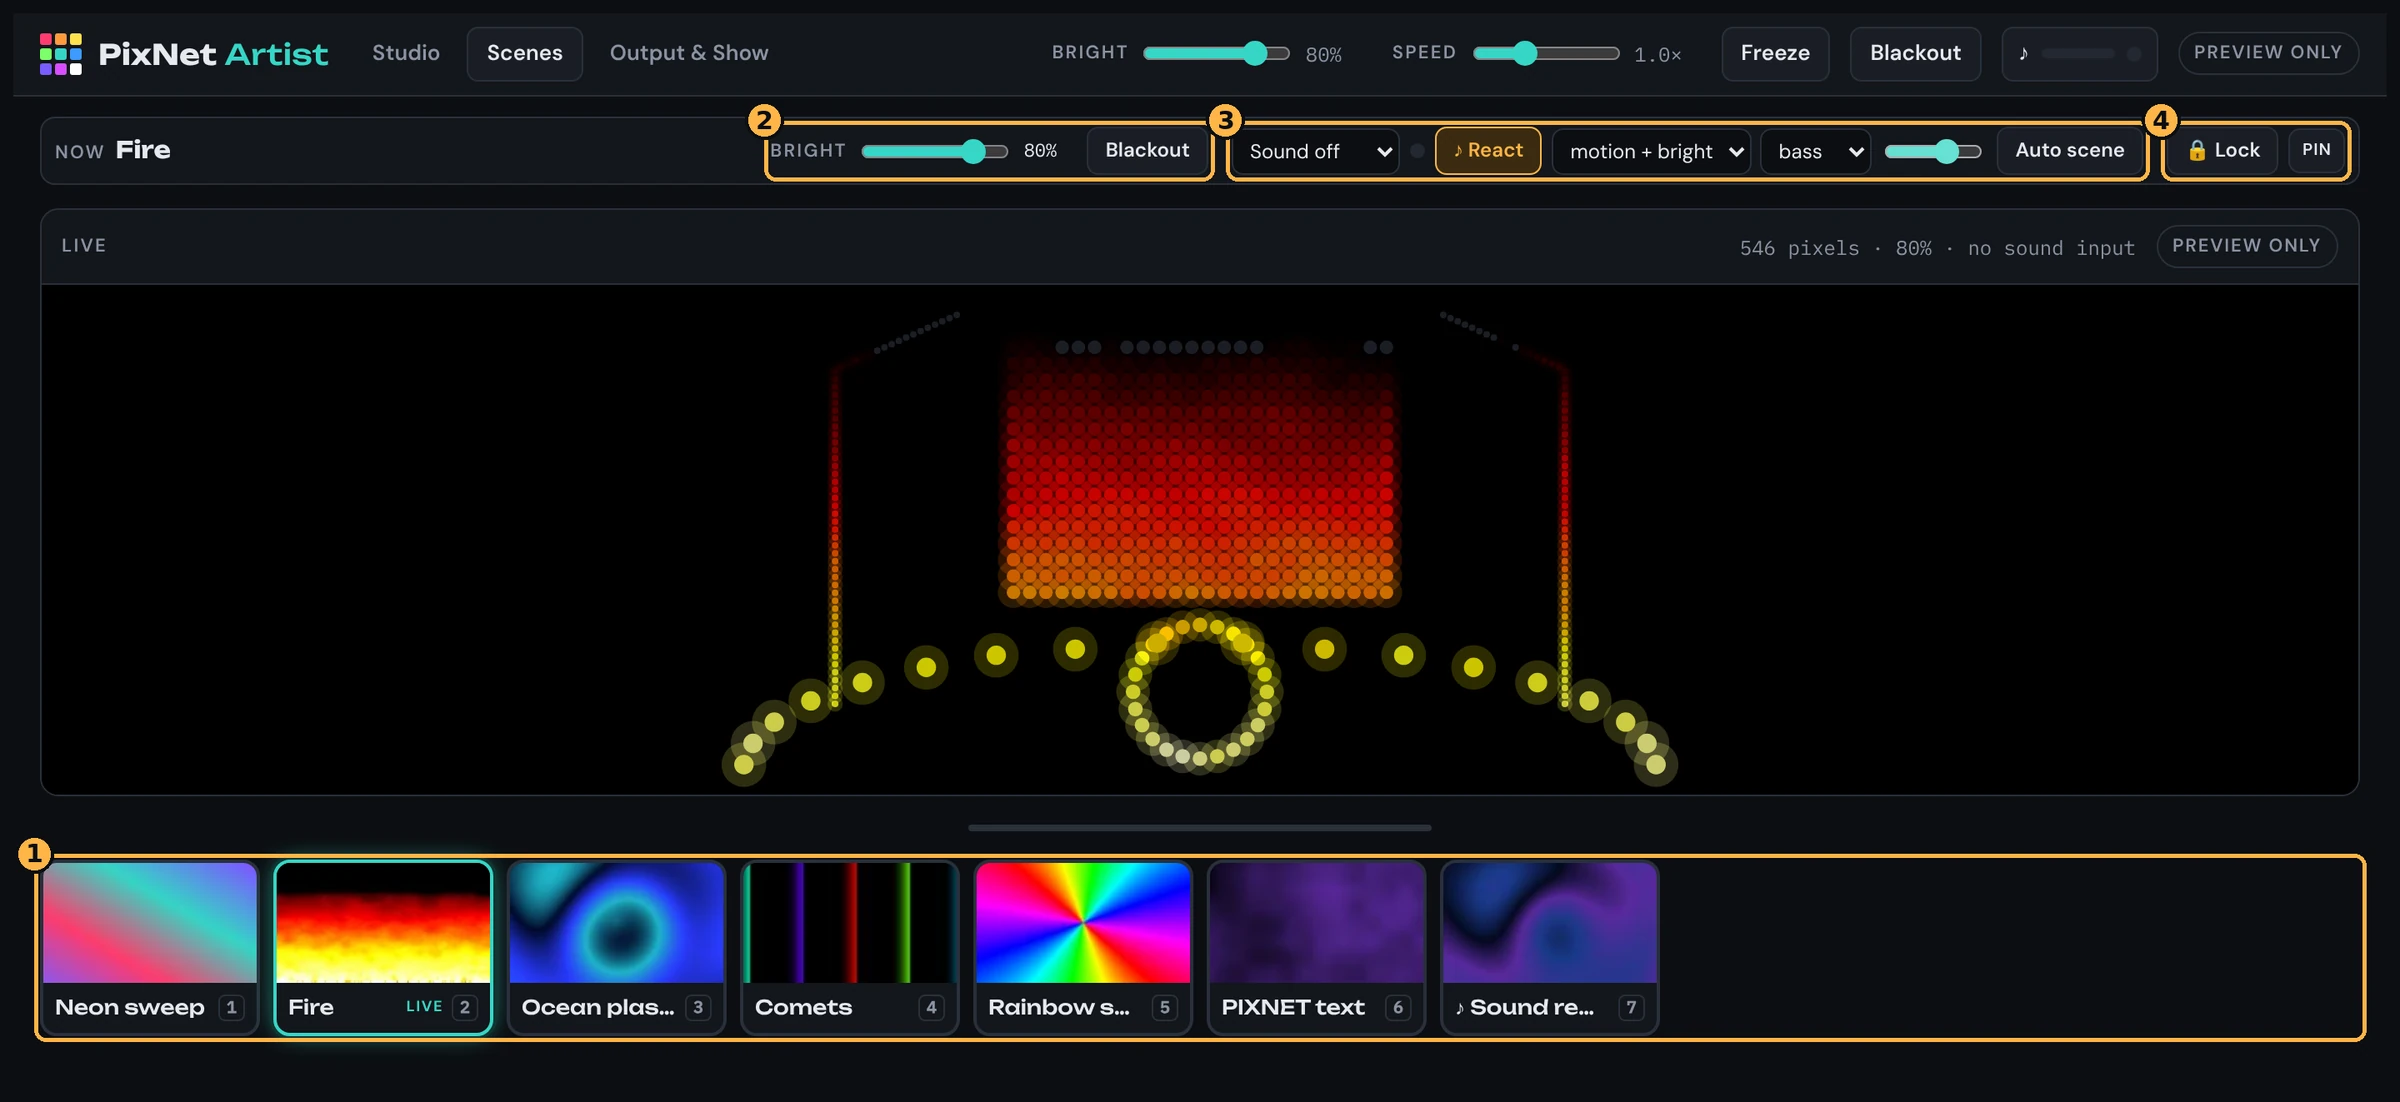
This guide takes you from installing to running a locked scenes screen. In the pictures, the orange numbers match the numbered steps.
01Install
- Download the installer from the download section and open it.
- If Windows shows "Windows protected your PC", click More info, then Run anyway.
- Choose where to install it, then finish. PixNet Artist is added to the Start menu and the desktop.
- The first time it runs, Windows Firewall may ask about network access. Allow it on Private networks, or the lights won't get any data.
Your computer and controllers need to be on the same network, for example a 192.168.1.x address on both. A wired connection or a dedicated lighting network works best.
02Start a show
Everything in PixNet Artist — the map, the wiring, the effects and the scenes — is one show.
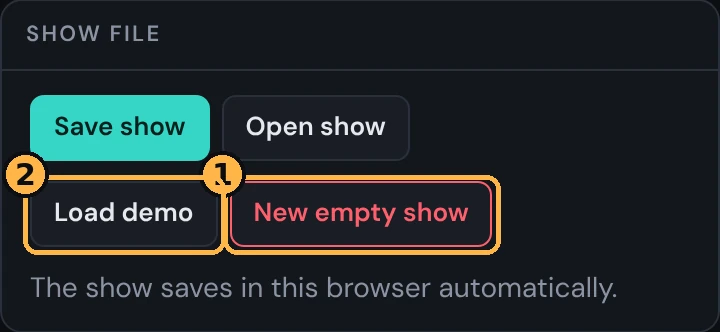
- Go to Output & Show and click New empty show to start from scratch.
- Or click Load demo to explore a ready-made example first.
03Draw your map
The map is a picture of your installation. Each strip, group of nodes, matrix or ring is an area.
- In Studio, open the Objects tab and click + Strip, + Nodes, + Matrix or + Ring.
- The new area appears in the list and on the map. Click it to select it.
- Set its name and pixel count on the right. Drag it on the map to move it, and drag the square handles to reshape it.
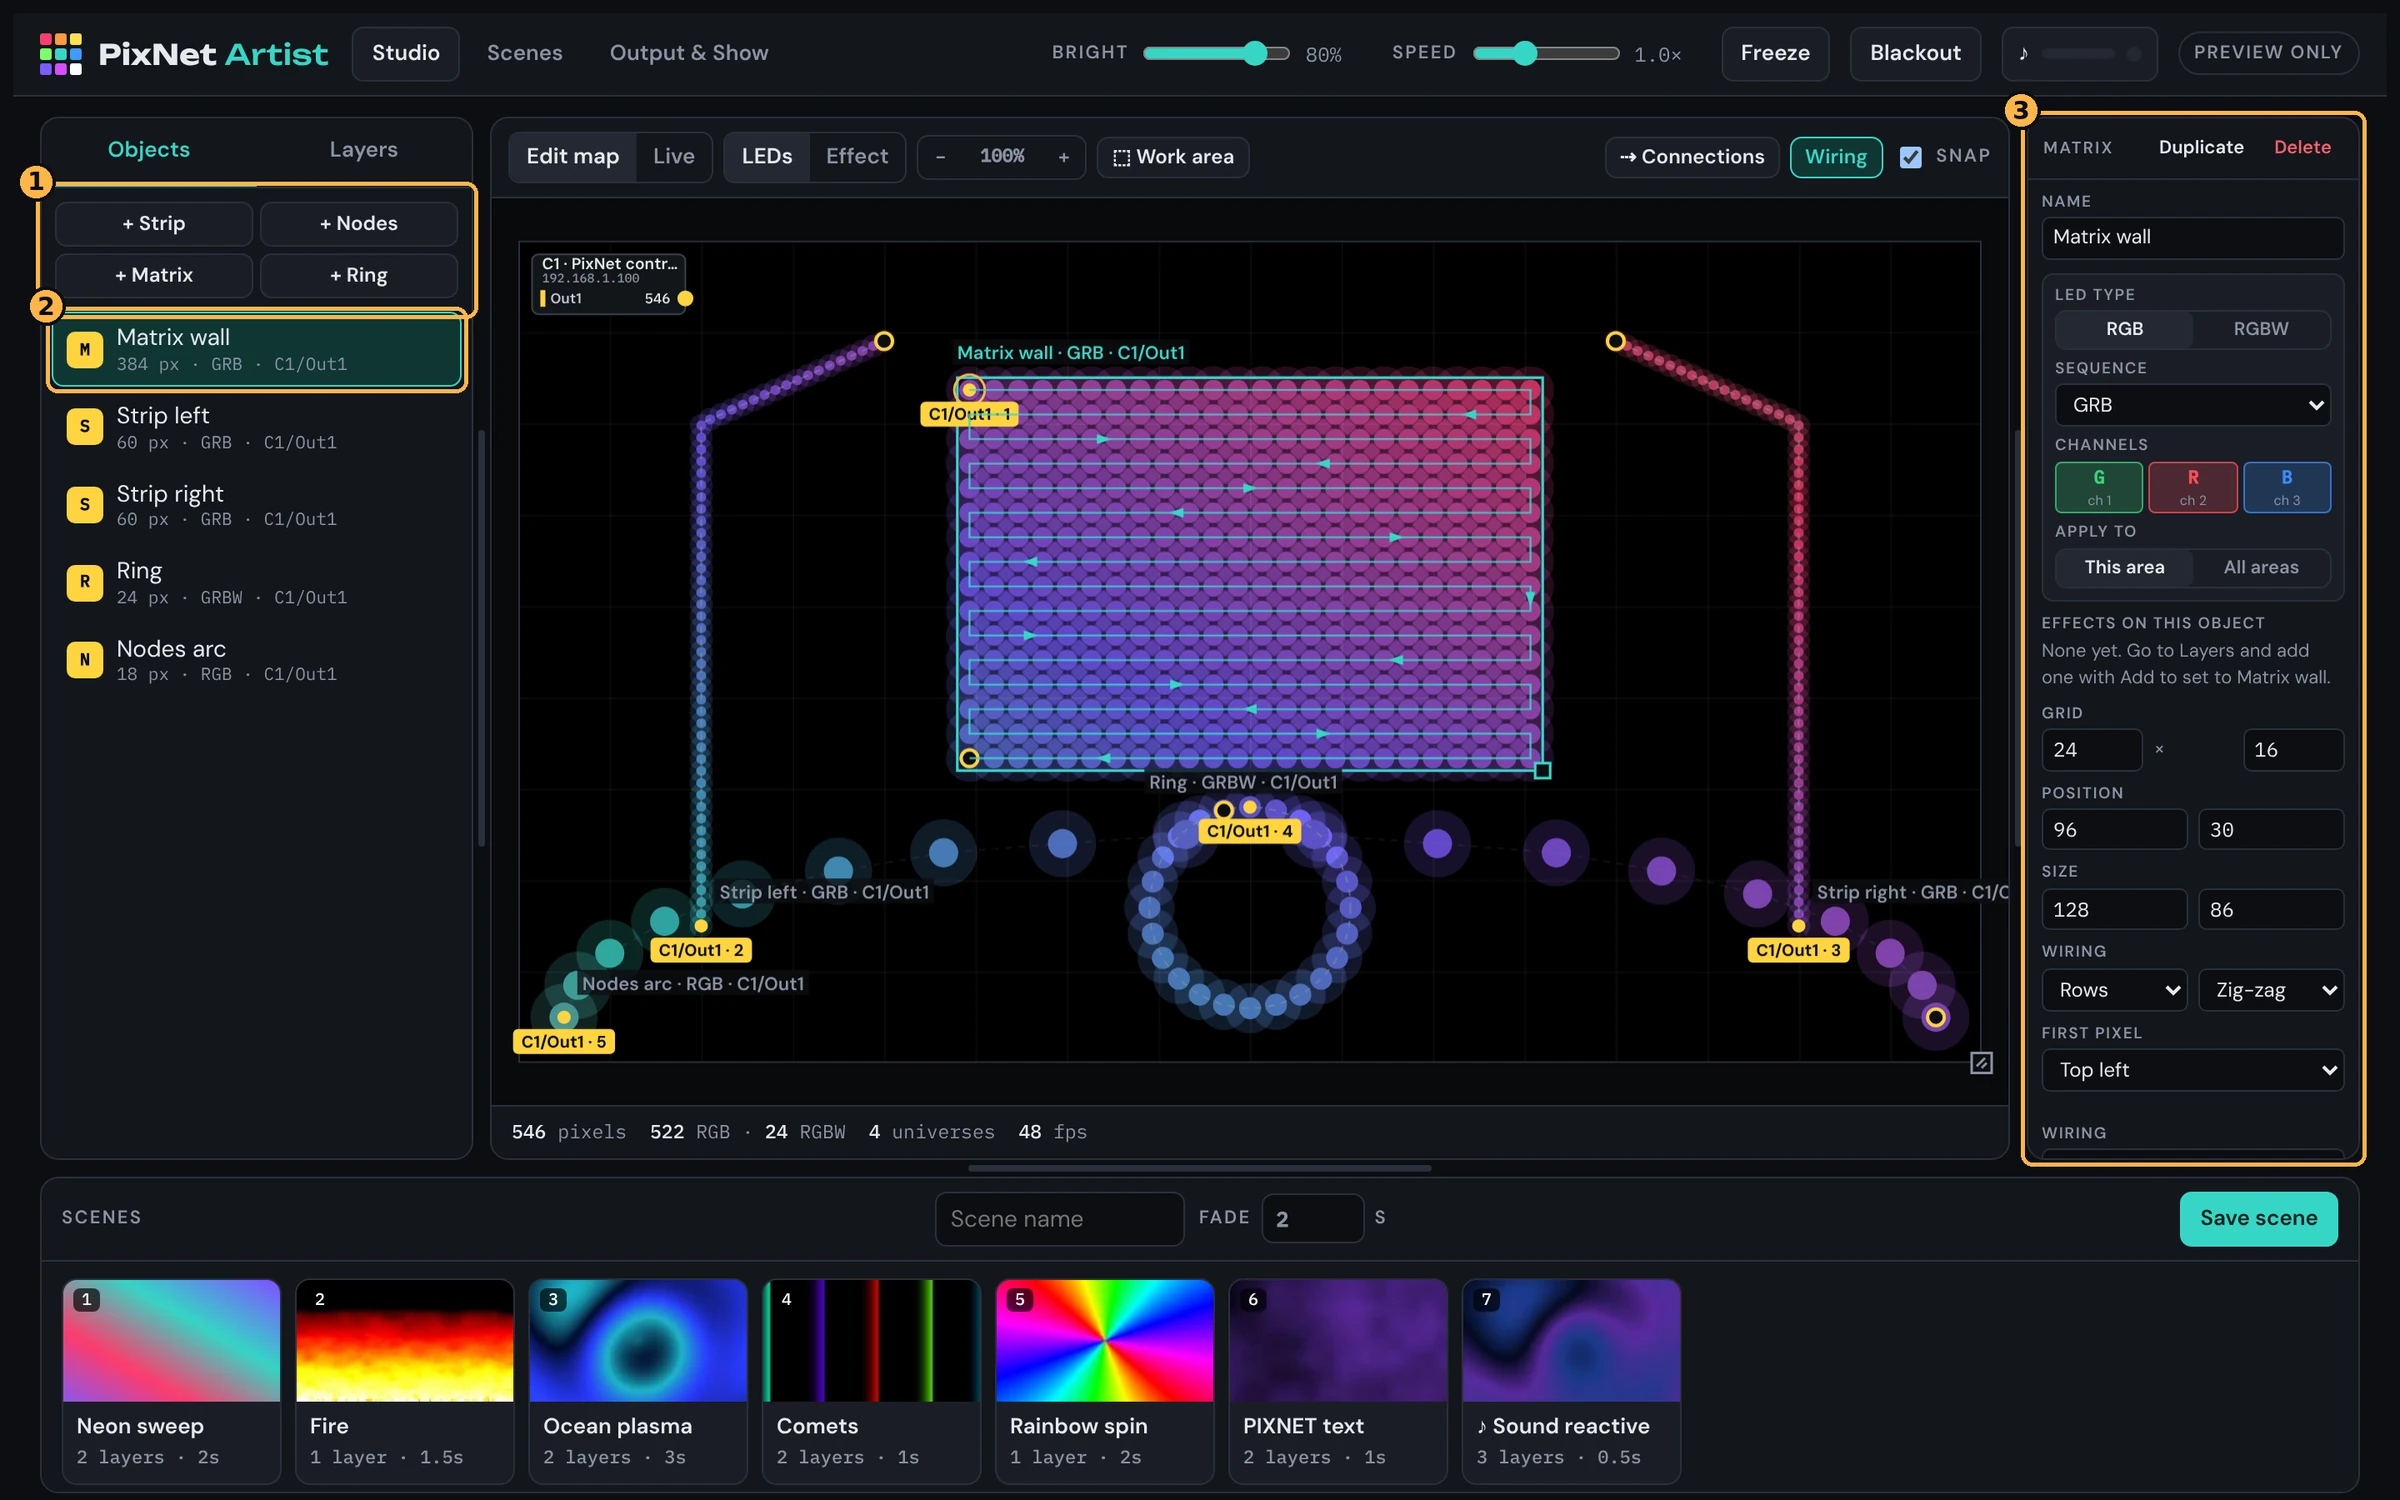
Strips: double-click the strip on the map to add a bend.
Nodes: each click on the map adds the next node in wiring order.
Pixel 1 is marked with an orange ring, so you can see where the data goes in.
Need more room? Click Work area to change the map size. Zoom with the − and + buttons.
04LED type and colour order
Get this right and the colours come out right. If red shows as green, the colour order is wrong.
- With an area selected, find the LED box on the right. Choose RGB or RGBW, pick the Sequence (for example GRB for WS2812 tape), and choose whether the change applies to This area or All areas.
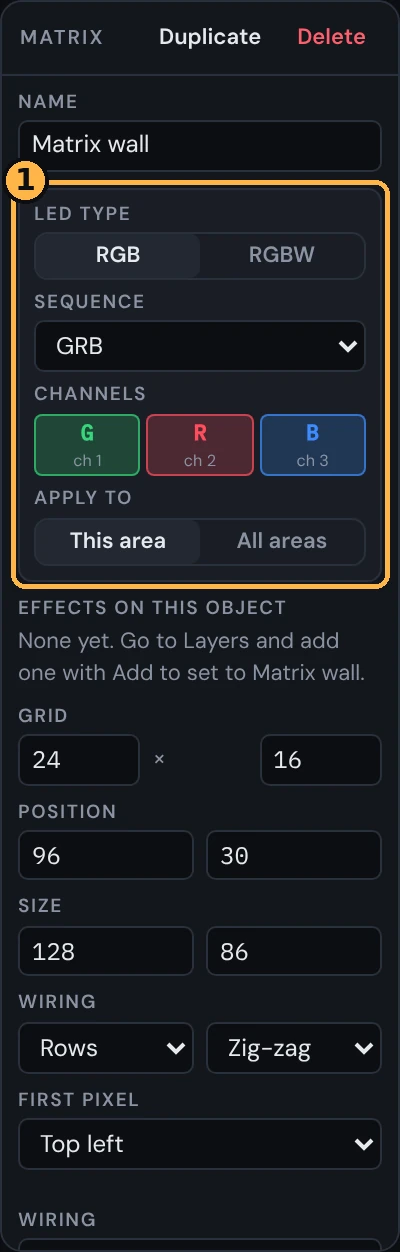
The Channels tiles show which colour goes on channel 1, 2, 3 (and 4 for RGBW). There are 18 sequences: six RGB orders, each with no white, white last or white first.
05Wiring inside an area
This tells PixNet Artist which way the data runs through the pixels of an area.
- Strips and rings: data runs from the first end (the orange ring). If yours goes in at the other end, tick Reverse.
- Matrices: under Wiring, choose Rows or Columns, Zig-zag or Progressive, and the First pixel corner.
- Anything unusual: set Wiring to Manual (draw it), click ✎ Draw wiring order, then click or drag across the pixels in the order the data reaches them.
Turn on Wiring at the top of the map to see arrows showing the data path through each area.
06Connect controllers
Tell PixNet Artist which controller output feeds which area.
- Click ⇢ Connections above the map.
- In the panel on the right, click + PixNet (or + Other for another make). Type the controller's name and IP address, and use − / + to set how many outputs it has.
- The controller box appears on the map. Drag from an output socket on the box to the first area it feeds. To chain, drag from that area's end socket to the next area.
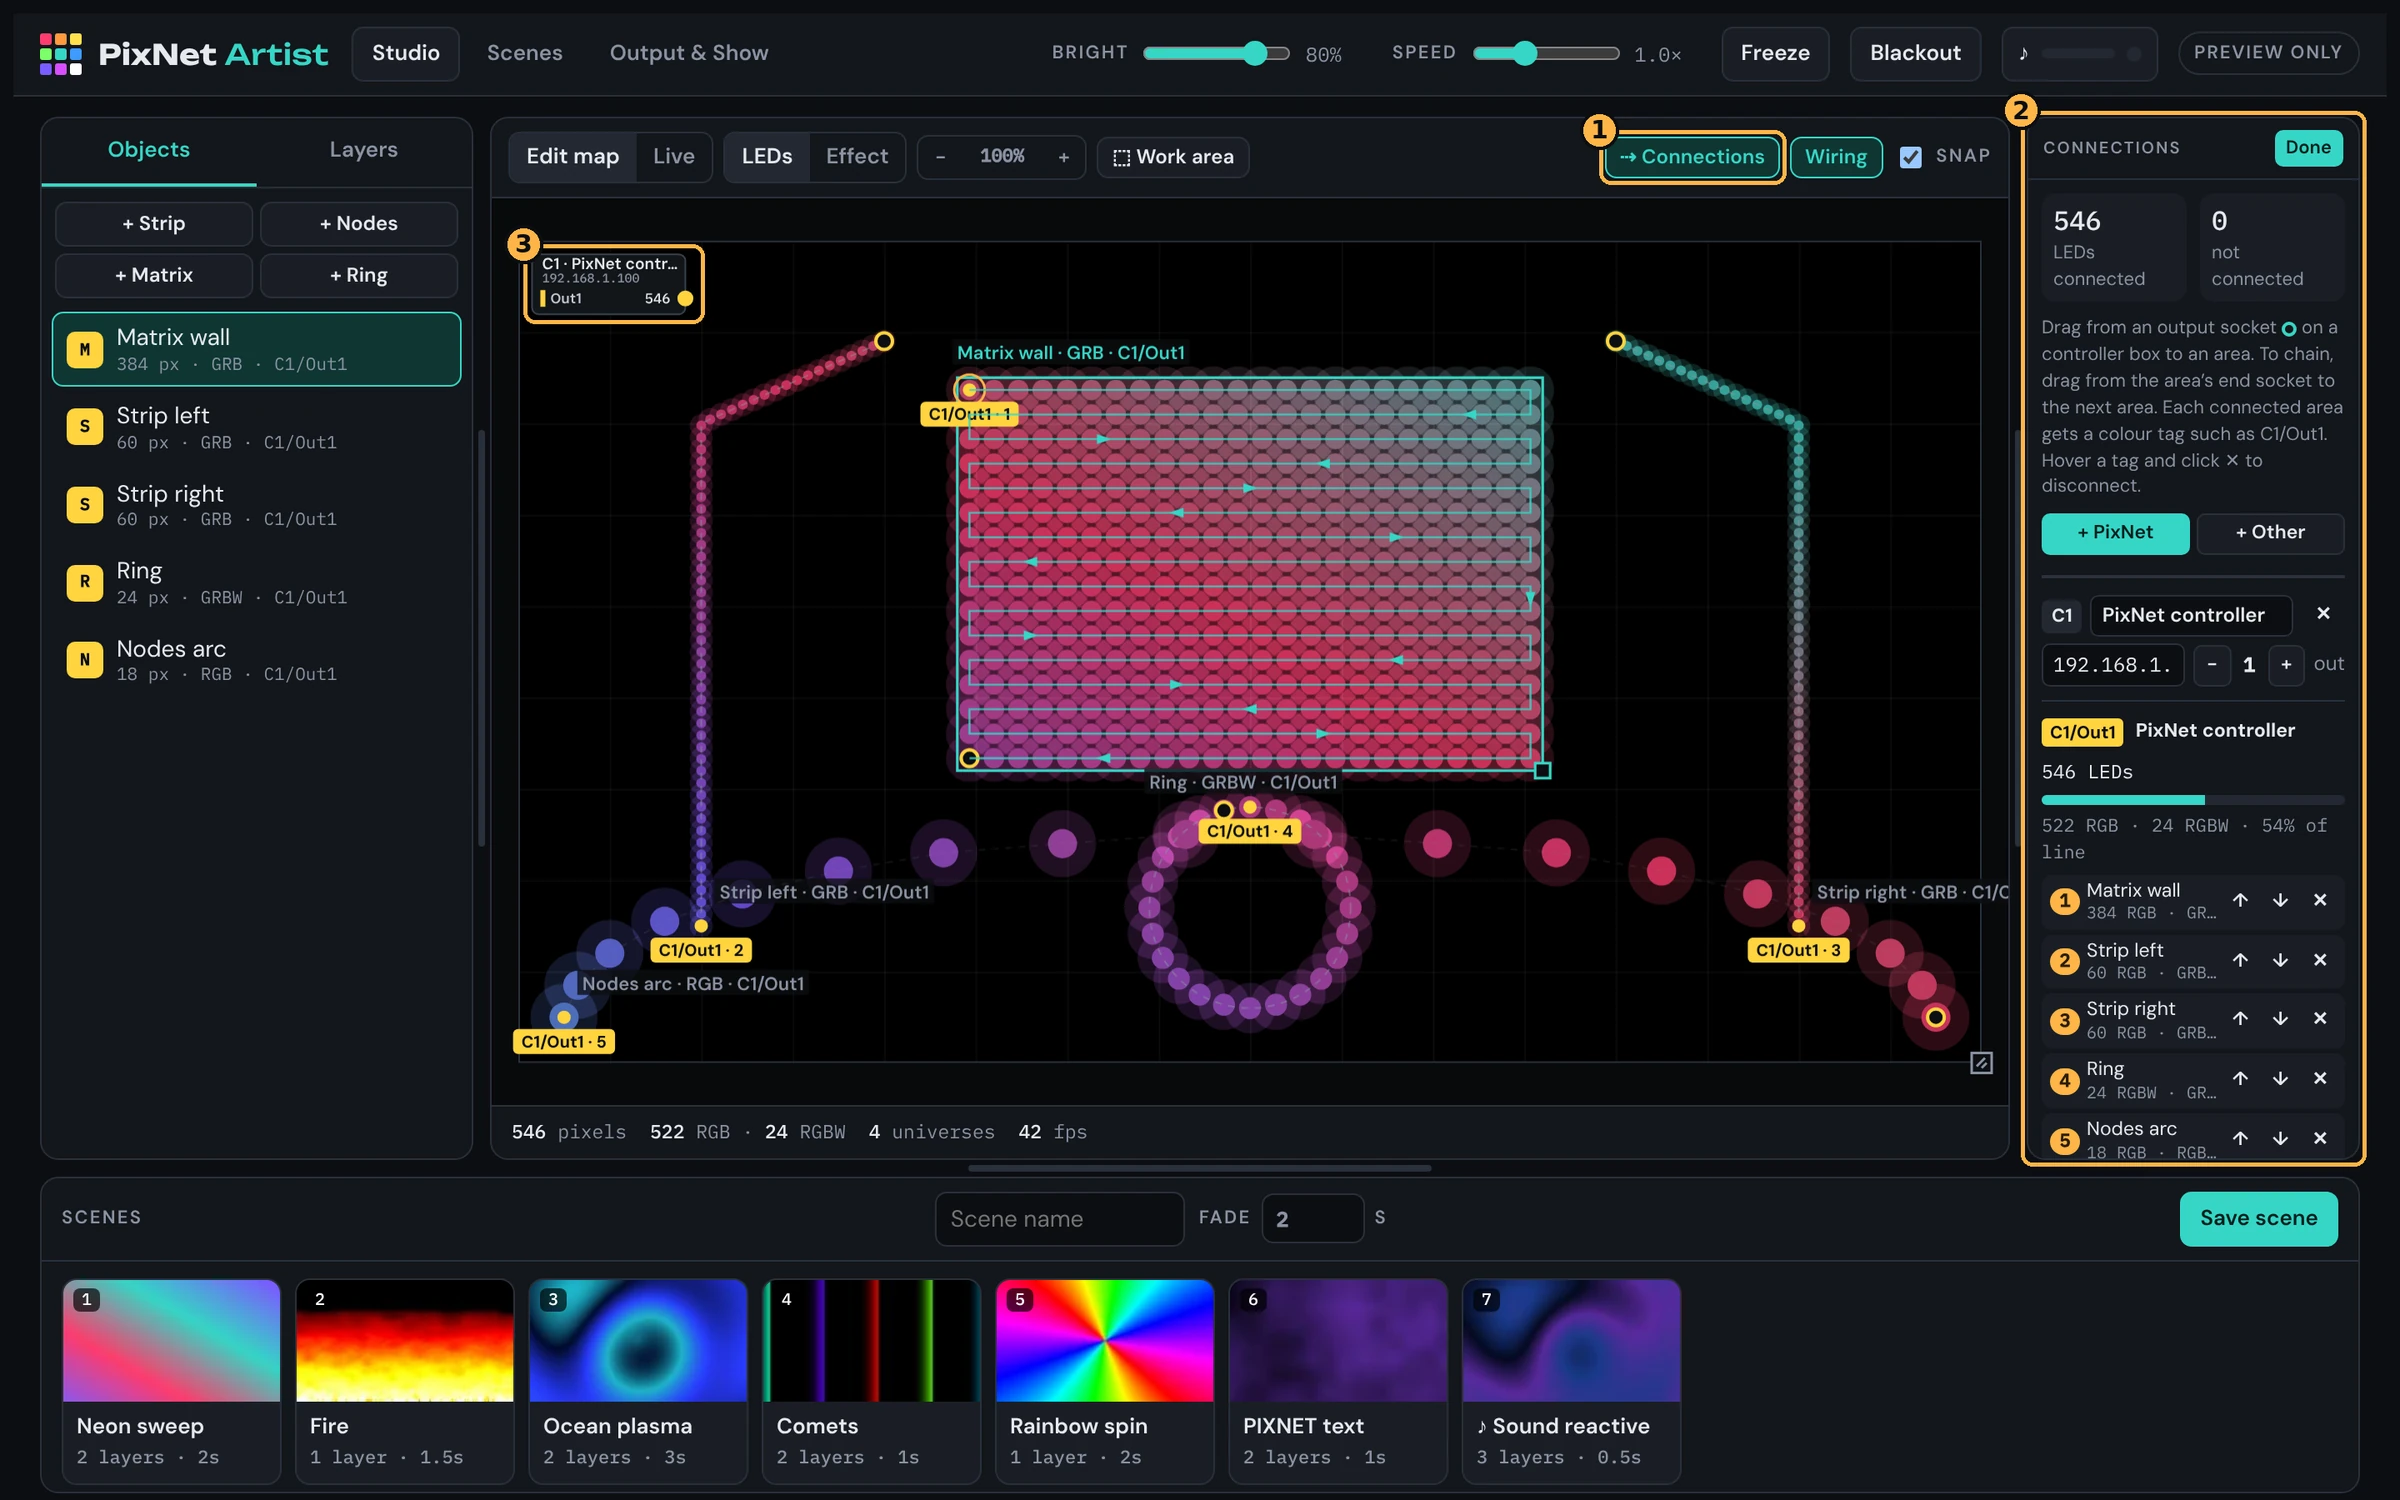
Each connected area gets a colour tag such as C1/Out1 · 2. That means controller 1, output 1, second in the chain.
To disconnect an area, hover over its tag and click ✕. Use the arrows in the panel to change the chain order.
Each output takes up to 1024 RGB or 768 RGBW pixels (6 universes). The panel shows each output's load, and areas over the limit are marked.
Controller details
Under Output & Show you can also set each controller's protocol (Art-Net or sACN) and first universe, and see every universe it uses.

07Add effects
Effects are layers. You can stack several and blend them together.
- Open the Layers tab, pick an effect from the list, then click Add layer.
- Use Add to to choose which area the new layer plays on, or leave it on all areas.
- Select a layer to change it on the right: effect, colours, speed, Blend and Opacity.
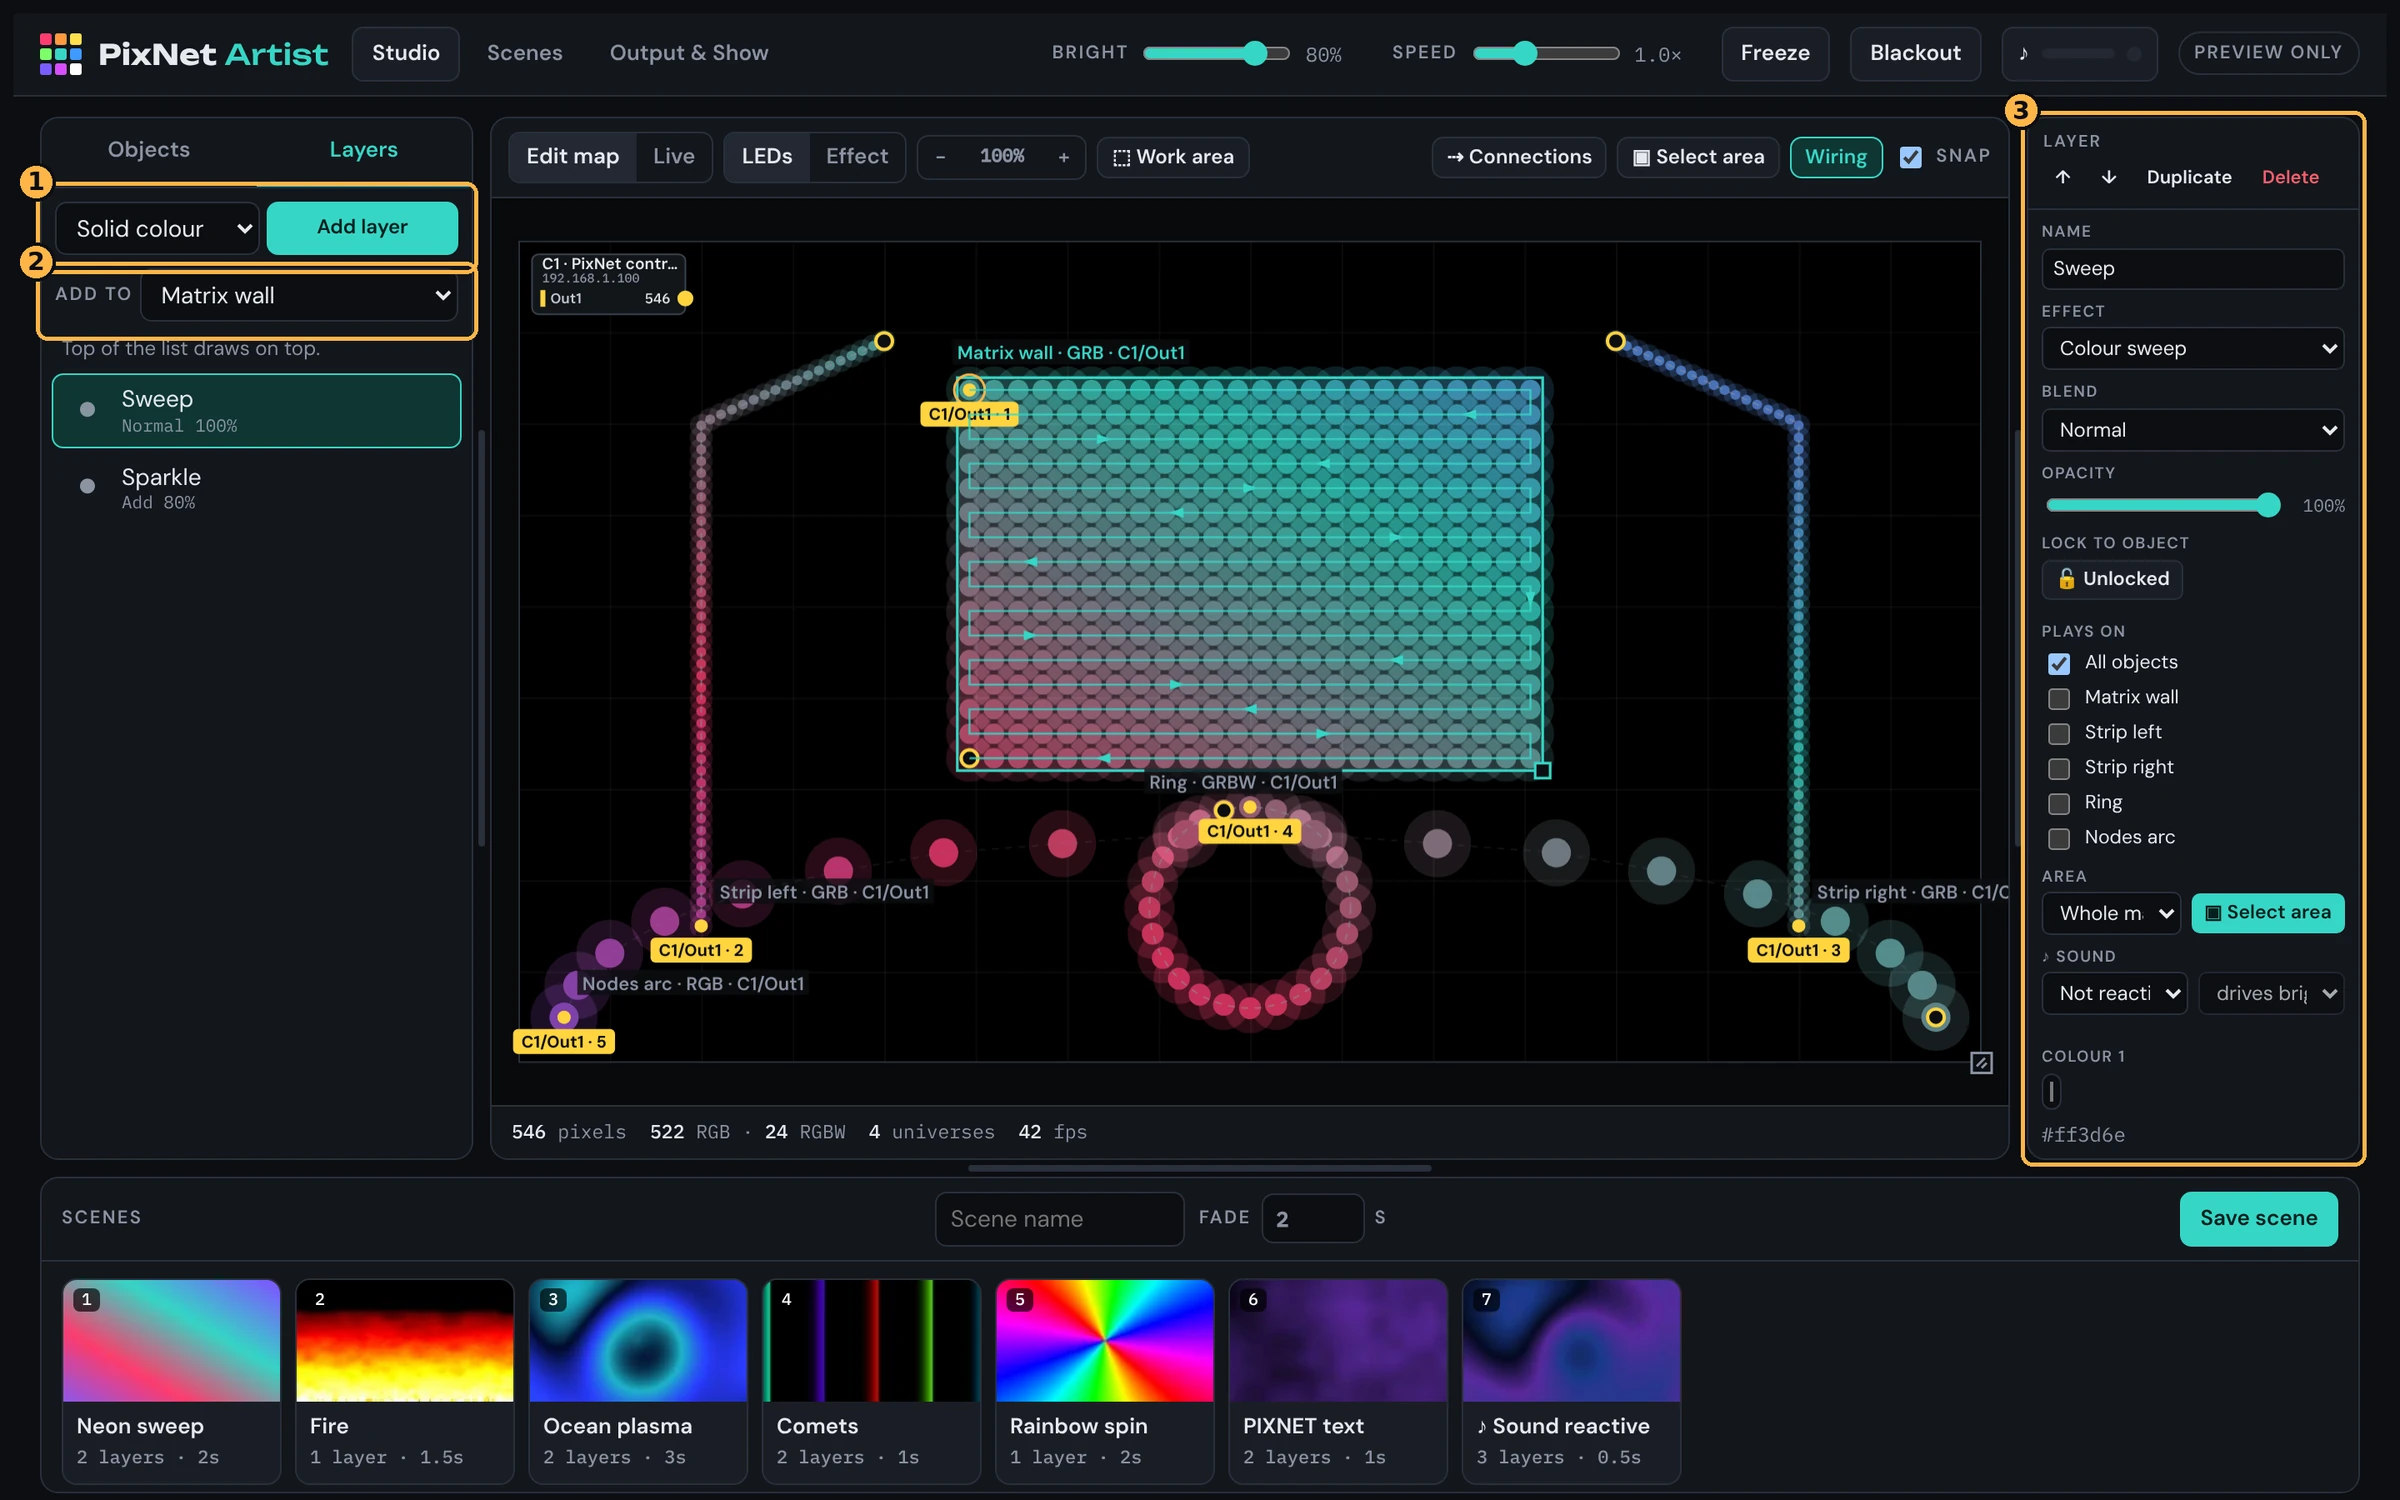
Lock to object: click 🔓 Unlocked to lock the effect to its area, so they move and resize together.
Area: click Select area and drag a box on the map to keep an effect to just part of the installation.
Sound: set a layer to react to the bass, level, beats or treble.
The top layer in the list draws on top. To delete a layer, select it and click Delete.
08Save scenes
A scene stores the current layers, so you can recall the look in one click.
- Type a name in Scene name and set the Fade time in seconds.
- Click Save scene. It's added to the row of scene tiles.

09Play scenes and use sound
The Scenes screen is the simple screen for running a show.
- Tap a scene to fade to it. Keys 1 to 9 also work.
- Set the Bright level. Blackout turns everything off (or press B).
- Sound: choose Microphone (or line-in from your mixer) or Music file. Click ♪ React to make the effects move with the music, and choose what they react to. Auto scene changes scene on the beat.
- 🔒 Lock hides everything except this screen (see the next step).
10Lock with a PIN
Locking leaves staff or clients with just the Scenes screen, so they can't change your setup.
- Click 🔒 Lock. The first time, choose a 6-digit PIN and type it again to confirm.
- To unlock, click 🔓 Unlock and enter the PIN on the keypad or keyboard.
- To change the PIN, click PIN while unlocked.
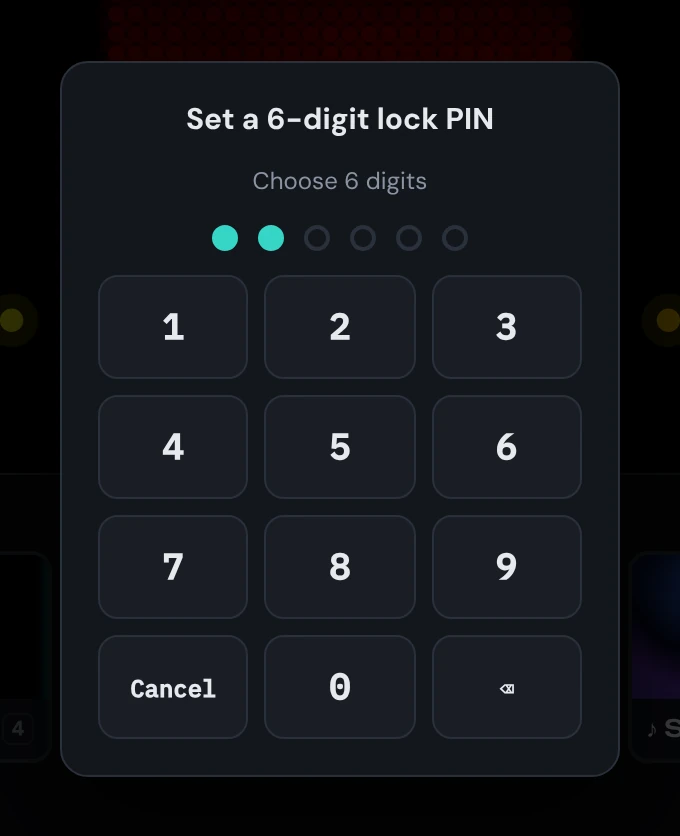
It stays locked after a restart. After 5 wrong tries the keypad waits 30 seconds. Write your PIN down somewhere safe.
11Go live and save your show
- The desktop app sends Art-Net or sACN to your controllers automatically. The label at the top right changes from Preview only to Output live when data is going out.
- Your show is saved automatically on this computer. To keep a copy or move it to another PC, go to Output & Show and click Save show. Use Open show to load it.
- Freeze holds the current frame. Blackout turns everything off.
Test patterns under Output & Show help you check each controller: R-G-B-W, a walking pixel, and one colour per universe.
12Troubleshooting
Nothing lights up
Check the controller's IP address in Connections. Make sure the PC is on the same network (for example both 192.168.1.x), and that Windows Firewall allows PixNet Artist on Private networks. Check that the protocol (Art-Net or sACN) and first universe match the controller's settings.
The colours are wrong
Change the Sequence in the LED box (step 04). Most WS2812 tape is GRB. If white looks pink or blue on RGBW tape, try white first instead of white last.
The effect runs the wrong way, or the pixels are jumbled
Check the wiring inside the area (step 05). Tick Reverse, change the matrix pattern or first pixel, or draw the order by hand.
Only part of the strip works
Check the pixel count on the area and the output load in Connections. Remember the limit is 1024 RGB or 768 RGBW pixels per output.
Sound isn't doing anything
Choose Microphone or Music file on the Scenes screen, then turn on ♪ React. If Windows asks for microphone access, allow it. Turn up Gain under Output & Show → Sound if the input is quiet.
Forgot the PIN
Contact PixNet Control for help.